Wes and I have been on a Thai food kick lately. This recipe is DELISH... I'm not sure how healthy it is, but you'll love it! :)
http://www.ourbestbites.com/2012/03/quick-and-easy-thai-coconut-soup/

A Delectable Collection of Recipes
Monday, February 18, 2013
Friday, December 28, 2012
Quick and Easy Alfredo Sauce
I replaced half the cream cheese with gorgonzola and ooohhhh lala - DELICIOUS!
INGREDIENTS:
1/2 cup butter
1 (8 ounce) package cream cheese
2 teaspoons garlic powder
|
2 cups milk
6 ounces grated Parmesan cheese
1/8 teaspoon ground black pepper
|
DIRECTIONS:
| 1. | Melt butter in a medium, non-stick saucepan over medium heat. Add cream cheese and garlic powder, stirring with wire whisk until smooth. Add milk, a little at a time, whisking to smooth out lumps. Stir in Parmesan and pepper. Remove from heat when sauce reaches desired consistency. Sauce will thicken rapidly, thin with milk if cooked too long. Toss with hot pasta to serve. |
Sunday, November 18, 2012
Aunt Melanie's Sheetcake Brownies
Brownies
2 C flour
2 C sugar
1/2 tsp salt
1/2 C cocoa
1/2 C margarine
1 C water
2 eggs
1 tsp baking soda
1/2 C buttermilk
1 tsp vanilla
Mix first 4 dry ingredients in a bowl. Melt margarine and water in pan; bring to boil. Stir into dry mixture. Combine eggs, soda, buttermilk, and vanilla and stir into other mix. Bake in sheetcake pan 10 min. at 350.
Frosting
1/2 C margarine
3 Tb cocoa
6 Tb milk
4 C powdered sugar
1 tsp vanilla
Melt margarine with cocoa and milk in pan over low heat. DO NOT BOIL. Add to other ingredients and mix well. Spread over warm brownies.
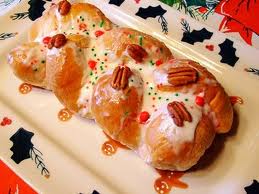
Grandma Barbra Jensen's Sweet Dough Bread
My mom didn't spend a lot of time in the kitchen, as far as I remember. Too many other demands on her time, I'm sure. But she made this special treat to take to all our friends every year for Christmas. This is close to what it looked like. I just found her recipe and thought I'd share it with you exactly as she wrote it.
Mix together.... 1 1/2 c lukewarm milk
1/2 c sugar
2 tsp salt
Soak............... 2 pkg dry granular yeast in
1/2 c lukewarm water for 5 min without stirring. Then stir well before adding.
Stir in............ 2 eggs
1/2 c soft shortening
7 - 7 1/2 c sifted flour
(Mix in first with spoon, then knead in with hands.)
After second rising, divide dough for desire coffee cakes. Round up, cover, and let rest 15 min so dough is easy to handle. Shape dough, let rise until light (15 - 30 min.) and bake according to directions for each type of coffee cake.
 Cinamon Roll Ring - With scissors, make cuts 2/3 of way through at 1" intervals. Turn each section out.
Christmas Braid - [Roll dough into rectangular shape.] Spread filling (My mom used canned cherry pie filling) down center of dough. Make diagonal cuts on each side of the dough and lace opposite sides of dough across each other.
Mix together.... 1 1/2 c lukewarm milk
1/2 c sugar
2 tsp salt
Soak............... 2 pkg dry granular yeast in
1/2 c lukewarm water for 5 min without stirring. Then stir well before adding.
Stir in............ 2 eggs
1/2 c soft shortening
7 - 7 1/2 c sifted flour
(Mix in first with spoon, then knead in with hands.)
After second rising, divide dough for desire coffee cakes. Round up, cover, and let rest 15 min so dough is easy to handle. Shape dough, let rise until light (15 - 30 min.) and bake according to directions for each type of coffee cake.
Cinamon Roll Ring - With scissors, make cuts 2/3 of way through at 1" intervals. Turn each section out. Christmas Braid - [Roll dough into rectangular shape.] Spread filling (My mom used canned cherry pie filling) down center of dough. Make diagonal cuts on each side of the dough and lace opposite sides of dough across each other.
Tuesday, October 30, 2012
Ancient Grains Bread
I've updated this recipe once again and since I had two requests for it just this morning, thought I'd repost it, for anyone who is interested.
Ancient Grains Bread
2 C. warm water
1/2 C. warm milk
1 T. yeast
1/2 C. honey
1/4 C. molasses
3 T. butter, melted
1 tsp. salt
1/4 C. orange juice (or, any other 100% juice)
3 T. gluten flour
3 T. ground flax (your body can't digest flax in it's unground state)
5-6 C. whole wheat flour
1/3 C. sunflower seeds
3 T. sesame seeds
3 T. millet
3 T. quinoa
3 T. amaranth
1-2 T. chia seeds
Sprinkle yeast over warm water and milk in large mixing bowl. Pour in honey and molasses. Let it sit for 5 minutes. Add butter, salt, and orange juice. Stir to combine. Add gluten flour, ground flax, and 2 C. wheat flour. Stir until well combined. Add all of the seeds. Stir to combine. Stir in as much flour as you can. Then knead in more until it's nice and firm. I've found that I use significantly more flour when I make this with my Bosch mixer, versus by hand.
First, let it rise in a lightly greased bowl (after turning dough to get it lightly greased on all sides), covered for a good long while. I usually give it anywhere from an hour to an hour and a half. Then, punch it down and divide it in thirds. Shape each half into a loaf and place in greased loaf pans. Glass is better than metal--trust me! Let it rise there for 45 to 60 minutes. Or more, if you have a tendency to forget your bread, as I do.
Grease loaf pans and preheat oven to 350. Bake for 30-45 minutes, if needed cover loosely with foil to keep it from over-browning (a.k.a. burning) and bake longer if needed. My oven bakes hot, so I cook this on the lower end of the time frame.
This recipe calls for a lot of different seeds. Feel free to substitute, or omit as you want. I'm currently trying caraway on one loaf upstairs. I also want to try pepitos and walnuts. I'll get back to you. Oh, and you can use all honey and no molasses, if you wish.
*The caraway tasted fine, but without it this bread is a little on the sweet side and I prefer it to stay that way.
Monday, October 22, 2012
The sauce recipe I used to bottle spaghetti sauce this year. (Anthony's Pasta Sauce)
So, just so we're clear, this recipe is the one I used to can spaghetti sauce this year.
It is NOT my recipe.
But you can find it here: http://spaghettisauceandmeatballs.com/.
I 3x this recipe, to fill my stock pot, which made 13 jars of sauce.
It's a really drawn out and fancy recipe. But, in my opinion, it's totally worth it. For one thing, it's a very tasty sauce. For another, it makes me feel like a gourmet cook. I don't usually feel that way because I'm not one, and I don't have any other recipes that I do that are this detailed and drawn out. But I seriously love making this sauce. It's just fun to me. Maybe I'm really wierd. But don't knock it until you try it. And I've never tried the meatballs yet, I'm ashamed to say. They sound really good.
When I make this sauce, I have always frozen it in bags before, but this time I tried bottling it. When I would freeze it, I would cook up some sausage and add it to the sauce in the early stages. I originally planned on doing this when I bottled it, but then found out you can only bottle meat with a pressure canner. I do have a pressure canner, but I really didn't want to spend the extra time it would take to use it. I have a steam canner that takes about half the time that the pressure canner does, so I just omitted all meat this time. I will just add sausage or whatever meat when I get the sauce out.
Also, I used 4 cups of tomato sauce that I got from tomatoes from our garden. I have a Sauce Master that makes it REALLY easy to make tomato sauce from fresh tomatoes, without any prep work (no peeling, dicing, or cooking).
So let me know if you try it. And Happy Cooking!
***10/28/12: I have now opened two jars of the sauce and they are VERY watery, so I would recommend either adding a lot less water than it says to, or to let it simmer for at least 30 min to 1 hour to let the water evaporate out.***
Wednesday, September 19, 2012
Vanilla Ice cream Base
Okay, so this recipe is LONG and it takes FOREVER! but it is SO worth it.
We make our ice cream because we are learning to be self-sufficient. No! really, it is because ice cream here is so expensive but making your own is cheaper. It also comes all freezer burn and tastes gross.
Anyway, this recipe is amazing and so good. We only make half of this recipe because it makes a gallon and we don't have two ice cream making machines.
From the variations we have made the chocolate one and it is DIVINE!!
And by We I mean Me! well... David has done the ice and salt part :-)
Put the ice cream in a tupperware container, rectangle is best. fill it up and then cover with plastic wrap, then put the lid on it. It will prevent freezer burn.
Vanilla ice cream recipe, Base
Ingredients
- 10 cups heavy cream
- 5 cups whole milk
- Pinch salt
- 3 cups sugar
- 3 vanilla beans
- 24 large egg yolks
Variations:
Chocolate-Chocolate Chunk Ice Cream:
- 3/4 cup whole milk
- 16 ounces semisweet chocolate, chopped in chunks
Strawberry Cheese Cake Ice Cream:
- 1 1/2 cups strawberry preserves, no sugar added
- 1/2 frozen strawberry cheesecake, cut in large chunks
- 10 large fresh strawberries, halved
Peanut Butter Cookie Dough Ice Cream:
- 1 tube ready to bake peanut butter cookie dough, cut in large pieces
Directions
To make the vanilla ice cream: Combine the cream, milk, salt, and 2 cups of the sugar in a large pot. Split the vanilla beans down the middle lengthwise and scrape out the seeds with a paring knife; add them to the pot and toss in the pods for added flavor. Place the cream mixture over medium heat, and bring up to a simmer; stirring with a wooden spoon to dissolve the sugar. Ideally, the temperature should reach 175 degrees F (just below scalding) for a smooth-textured ice cream; this should take about 15 minutes. Shut off the heat, cover the pot, and allow the cream mixture to steep for 15 minutes to further infuse the vanilla flavor.
In the meantime, combine the egg yolks in a large mixing bowl and blend them lightly with a wire whisk. Gradually add the remaining 1 cup of sugar and continue to whisk until the sugar is completely dissolved and the eggs are thick and pale yellow; about 6 minutes.
Using a large ladle or measuring cup, temper the eggs by gradually whisking in about 4 cups of the hot cream mixture. Return this back to the rest of the cream in the saucepan and turn the heat to medium-low. Stir constantly until the custard thickens and leaves a path on the back of a spoon when you run your finger across it, about 10 to 12 minutes (do not let boil.)
Pour the vanilla custard through a fine strainer into another pot* and chill completely in a sink full of ice, stirring here and there; this should take about 1 hour. Ideally, let the ice cream base "age" overnight in the refrigerator before churning in an ice cream maker to improve the flavor and texture of the final product – but it is still good if you decide to process it right away. Divide the ice cream into quarts** and churn each in an ice cream maker according to manufacturer's directions. When done, the ice cream will be the consistency of "soft serve." ***To harden the ice cream fully, freeze in plastic covered containers.
Flavor Variations:
*To make the Chocolate-Chocolate Chunk Ice Cream: Heat 3/4 up of milk in a pot over medium-low heat. Add 12 ounces of the chopped chocolate and stir until completely melted. Pour 1 quart of the strained hot vanilla ice cream base into the melted chocolate and stir until very well incorporated. Chill and process as directed in the master recipe. Fold in the remaining 4 ounces of chopped chocolate after churning while the ice cream is in the "soft-serve" stage. Churn another 1 to 2 minutes just until combined.
**To make the Strawberry Cheesecake Ice Cream: Mix the strawberry preserves into the vanilla custard just before you start churning in the ice cream maker. Add the pieces of strawberry cheesecake and fresh strawberries after churning while the ice cream is in the "soft-serve" stage. Continue to churn for an additional 5 minutes or until combined but still chunky.
***To make the Peanut Butter Cookie Dough Ice Cream: Add the pieces of cookie dough after churning while the ice cream is in the "soft-serve" stage. Continue to churn for an additional 1 to 2 minutes until combined but still chunky.
Subscribe to:
Posts (Atom)